
Beginners Guide To Wildlife Photography
As a professional wildlife photographer, I have the opportunity to spend extended periods in the field to capture what I consider the perfect shot, often with the luxury of spending days with different species that an amateur might be able to invest in. You have other commitments and may be unable to dedicate as much time and resources to photography as I do.
In this post, I will offer as much information as possible to help you learn from all my experiences photographing wildlife. It’s a long read… you might want to save this one in your favourites and keep coming back to refer to the information in this post.

A lilac-breasted roller photographed in Tanzania
Research and Planning My Wildlife Trips
Before you head out with a camera, the first and one of the most overlooked things you should be doing is researching locations and learning about the species you want to photograph. The research level you need to do will decline over time because you have practical experience in the field with the animals. But if it's a species you know little about, arming yourself with valuable knowledge about the species in their environment is an essential first step.
WHERE TO DO YOUR RESEARCH?
I spend countless hours watching videos of wildlife in their natural environment. The amount of footage out there is almost endless. From documentaries on streaming services to random videos on YouTube, you should be able to arm yourself with environmental and species behavioural knowledge before stepping into the field.
I also read about the species that we are going to photograph. Even the smallest of details could make a difference in the quality of images you take with the subject in front of you. I will also talk to professional guides. If I am interested in birds, I interact with birders with in-depth knowledge of the species they follow. If I am headed to northern Canada, I talk to professional trackers about northern species like Caribou, wolves, bears, and Lynx that I might want to photograph. If it's an International destination like Africa, I would have contacted people we follow on social media to discuss their experiences. I then contacted tour companies experienced in creating trips at the destination I was looking at.
If I know there is wildlife in a local area, I will take a hike and look for tracks or other signs of activity, like bedded areas in the long grass. Look for feces or skeletal remains. You can also set up a trail camera where you suspect activity. Let the camera sit for a week, then see if this looks like the right spot for a blind. If you capture wildlife, note the times of the day and plan to visit this area long before your trap camera captures the wildlife.
WHAT INFORMATION IS VALUABLE
The details you want to uncover in this initial discovery phase will help you better understand where you should be looking at travelling. These details will help you know how the animals live in the environments you are looking at visiting. All this information that you gather will go a long way to ensure that you are more successful when you are out in the field.
I would suggest you research the following:
Species Habitats: You want to learn where they live and hunt.
Migratory patterns: Where does the species migrate into accessible areas that you can visit.
Breeding seasons: Most species are more photogenic in their mating season. We want to photograph most species' youth. In the case of the Canidae family, like wolves or species of the Felidae family of cats, this is also the best time to witness predation because of the increased need to eat.
Logistics: How do you get there? Who will guide you? A workshop company, group tour, or private guide? Where will you stay? Are there any safety concerns?
Seasonal weather patterns: You want to avoid getting caught off guard with the wrong clothing and protective gear for your camera.
PRE-VISUALIZATION COMES OUT OF YOUR RESEARCH
As I previously mentioned, while researching, I will look at streaming video services and images of the animals on Google. I will start to create a folder of pictures before I travel. Think of these images as a shortlist of images that you find personally appealing. You will not limit yourself to taking just the pictures you placed in your folder. These are just images that you hope to get. It's a good exercise to pre-visualize animal behaviour before you are "in the moment" with your camera in hand.
Start to think about the environment you will be dealing with. Study backgrounds, and look for compositions you want to try and capture.
Look at the animals and identify nuances that may pose difficult to shoot. Think of a Bald Eagle – That white head can often get blown out if you are not thinking about your exposures ahead of time.

A Gentoo penguin photographed in Antarctica while on a zodiac cruise.
Our Favorite Locations For Wildlife Photography
There are countless incredible locations worldwide for photographing wildlife, each offering unique opportunities and experiences. Here are the top 10 wildlife locations we have ever experienced at Akari Photo Tours, along with reasons why they stand out in our minds.
Maasai Mara National Reserve, Kenya
Known for the Great Migration, where millions of wildebeest, zebras, and other animals migrate between Maasai Mara and Serengeti National Park in Tanzania. It offers dramatic scenes of wildlife crossings, predator-prey interactions, and stunning landscapes.
Yellowstone National Park, USA
Home to a wide variety of wildlife, including bison, elk, wolves, grizzly bears, and more. The park's diverse ecosystems, geothermal features, and expansive landscapes provide endless opportunities to capture some of the best wildlife images in the continental US.
Serengeti National Park, Tanzania
It is known for its vast open plains, where you can witness iconic African wildlife such as lions, elephants, giraffes, and cheetahs. It's particularly renowned for its big cat populations and opportunities to witness predation, especially during the iconic wildebeest migration.
Antarctica
Offers unparalleled opportunities for photographing wildlife in a pristine and remote environment. Antarctica provides unique subjects against a backdrop of stunning icy landscapes, from massive colonies of penguins to seals and whales.
National Parks, India
India is home to the majority of the world's wild tigers, and its tiger reserves offer some of the best opportunities to photograph these majestic big cats in their natural habitat. Reserves such as Ranthambore, Bandhavgarh, Kanha, and Corbett are famous for their tiger populations and provide excellent chances to observe and photograph them.
Newfoundland, Canada
Located on the eastern coast of Canada, Newfoundland offers a diverse range of some of the most accessible bird photography opportunities due to its varied habitats, coastal landscapes, and position along migratory routes. Newfoundland's coastal waters are rich in marine life, attracting whales, dolphins, and killer whales that are highly accessible.
Katmai National Park, Alaska
Katmai National Park, located in southern Alaska, is renowned for its exceptional wildlife photography opportunities, particularly for capturing images of Alaska brown bears and other iconic Alaskan wildlife.
These locations stand out for their rich biodiversity, unique wildlife species, and picturesque landscapes, allowing photographers to capture breathtaking images and unforgettable moments in nature.
Galápagos Islands, Ecuador
Famous for its unique and diverse wildlife, including giant tortoises, marine iguanas, and blue-footed boobies. The animals here have evolved without natural predators, making them more approachable for photography.
Costa Rica
A biodiversity hotspot, Costa Rica boasts lush rainforests, diverse ecosystems, and abundant wildlife, including almost 1000 species of colourful birds like toucans and macaws. You can also photograph monkeys, sloths, and reptiles. It's a true paradise for nature photographers.
Churchill, Canada
Known as the "Polar Bear Capital of the World," Churchill and the areas north of there offer unparalleled opportunities to photograph polar bears in their natural habitat as they wait for the sea ice to freeze. Depending on where you go, it's also a great location for photographing beluga whales and other Arctic wildlife, such as Caribou, Musk Oxen, Arctic Fox and a variety of bird species.

Wildlife Camera Gear
Which photography gear should you consider for wildlife? A mirrorless camera or a DSLR? Fast or slow lenses? Tripod or no tripod? How about filters? It can all be so confusing.
Photography gear might not be the most important factor when creating great wildlife images, but it's still an essential ingredient. After all, you do need photography equipment to make images. Consider your gear as mere tools, and to make the most of these tools, you have to know what they do, how they work, and how they can be best applied to create different types of wildlife images.
What works best for a full-time pro might not necessarily be best for the occasional weekend or holiday shooter. Some critical factors that might be right for you are cost, features, physical size, weight, and comfort level. Having gear that is too big, heavy, or complicated for your skill level is every bit as debilitating to your chances of success as gear that might be considered inferior.
Having said all that, as a general matter, effective wildlife photography equipment should be fast, reliable, and able to produce high-quality images in various types of lighting conditions.
Capturing action and wildlife behaviour is often at the heart of what I do as a wildlife photographer, so speed is always one of the most important considerations with most of my gear. Fast autofocus and shutter frame rate are camera features I rely on for the most consistent results and for capturing that decisive moment.
To ensure a safe working distance between you and a potentially dangerous animal or to fill the image frame with the wildlife subject you’re attempting to capture, a telephoto lens is the one piece of gear you should consistently rely upon. The faster the lens, or as having the largest maximum aperture, the better it is for shooting in low light conditions.
We often photograph wildlife in remote places, so equipment reliability is an incredibly important factor, particularly when subjected to various types of weather and conditions. Extreme heat and cold, rain, saltwater, dust, humidity – to name a few – can wreak havoc on the sensitive electronics found in cameras, lenses, computers, hard drives, and more. So how we pack and store our gear when traveling to remote places is essential as well.
In this section, we'll help you sort it all out: gear basics, cameras, lenses, camera accessories, teleconverters, filters, camera bags, tripods, flash, blinds, storage devices, software, and how best to travel with all this stuff.
By the end of this section, you'll have a better idea of what gear you might need, what equipment you might not need, and why.
Cameras
Let’s first dig into wildlife cameras. We are going to navigate through the weeds and come out the other side having armed you with the right information.
When it comes to deciding which camera is best for wildlife, there are so many choices, brands, and features from which to choose. Film still has a place in certain photography genres, but for wildlife, it's not ideal. So, for that reason, we are strictly talking about digital cameras here. As a general matter, the two most important choices concerning digital cameras for wildlife are camera type and image sensor size.
The DSLR, the digital single-lens reflex camera, has been the favorite of pros for almost two decades. It has a mirror and pentaprism, meaning you see the scene through an optical viewfinder. But because of this camera design, DSLRs tend to be larger, bulkier, and heavier in size than other camera types available today. And for this reason, DSLRs are starting to fall out of favor with photographers as newer mirrorless models match and exceed their predecessor's capabilities. The mirrorless camera has no pentaprism or optical viewfinder, so it's lighter and more compact. You see your subject live through the LCD screen on the back of the camera or an electronic viewfinder in the eyepiece.
Camera manufacturers are pouring more of their financial resources into technology, new features, and lens choices for their mirrorless camera systems than DSLRs these days, so mirrorless seems to be the most logical place to start when building a camera system for wildlife if you just happen to be starting out.
Regarding the camera's image sensor, size does happen to matter. Cameras that are considered full-frame models have an imaging sensor that's about the same size as a piece of old 35mm film – 36mm x 24mm. The larger surface area produces higher quality images – less digital noise, better dynamic range - than cameras with smaller sensors. APS-C or cropped-sensor cameras have imaging sensors of 22mm x 16mm.
Some wildlife photographers prefer camera models with a smaller sensor since it produces a magnification factor – or more accurately called a "crop factor" – which gives all lenses a longer reach. For example, Nikon has a built-in 1.5x magnification factor on these models and Canon 1.6x. Therefore, a 300mm lens has a 420mm reach on a Nikon APS-C camera body and a 480mm reach on a Canon.
Other important camera features to consider with wildlife photography are burst speed, number of autofocus points, in-body image stabilization, and weather sealing.
Burst speed refers to the number of images the camera can capture per second or "frames per second." The higher this number, the better your odds will be of capturing that decisive moment during fast-paced action or animal behaviour. The difference between getting the perfect wing position with a bird in flight and not getting it could be how many frames per second your camera can capture. For successful wildlife photography, 8 frames per second would be considered the minimum we would recommend.
The more autofocus points your camera offers, the less risk you have of losing focus-lock while tracking a fast-moving wildlife subject. It's also a lot more convenient when trying to focus on an animal or bird that is not in the dead-center bull's eye of the image frame.
In-body image stabilization is a relatively new camera feature that reduces blur due to camera movement during the exposure. Since wildlife photography involves using longer lenses, which are particularly prone to camera shake, this is a valuable feature to consider. If you see an African safari or Antarctica photography cruise in your future, image stabilization in the camera, the lens, or in tandem could save the day on more than just one occasion.
And lastly, it should be evident to all that wildlife photography is to be enjoyed in the outdoors where the natural elements can potentially damage your camera's sensitive electronics. Weather sealing is a feature that can protect your camera from the elements, particularly light rain, humidity, and dust. The alternative to a weather-sealed camera is putting it away during these conditions, missing shots, or camera malfunctions at inopportune times.
So to quickly recap, here are a few things to consider when it comes to the right camera for wildlife photography:
1– A DSLR or Mirrorless? Both are good options, but the mirrorless system is clearly the future.
2– Full frame or cropped sensor, APS-C? All things being equal, the full-frame sensor delivers better quality, but the APS-C offers extra reach.
3– Burst Speed. The more frames per second, the better.
4– Autofocus Points. The more AF points the camera offers, the more viewfinder coverage for focus tracking and compositional options.
5– In-body Image Stabilization. Highly recommended.
6– Adequate Weather Sealing. You're going to be outdoors in dust and moisture, so this feature is indispensable.
Lenses for Wildlife Photography
Now we're going to talk about the gear wildlife photographers love and lust over the most – lenses. A good wildlife lens will - and probably should – be the biggest gear investment you make so let's talk about some of the more important features and options to look for in lenses.
Wildlife photography can be done with any lens – from wide-angle to super-telephoto – depending on the situation and what you're trying to communicate with your photo. But the vast majority of shooting opportunities you'll encounter will require a telephoto lens of some sort. The reasons?
It's natural for wild animals to stay as far away from humans as possible. A telephoto lens can reach out to magnify your wildlife subject in the viewfinder so you can count each whisker on that lion's face if that's your wish.
There are some animals with which you don't want to get too close. Keeping a respectable distance is good and safe for both the photographer and the animal.
The perspective a telephoto lens produces is especially pleasing for animal portraits as it creates separation between your subject and the background. Also, the narrow-angle of view makes it much easier to control the background content.
Depending on the species, most wildlife photography work requires a focal length of at least 400mm to keep animals calm and relaxed while keeping you at a safe enough distance. Telephoto lenses of 400mm and longer are referred to as super-telephoto lenses, and they are generally large, heavy, and expensive.
Major Considerations:
The focal length of a lens, in practical terms, refers to its reach. I'll skip the technical explanation here. To photograph small birds or very shy wild mammals, a focal length of 400mm minimum would be necessary, and 600mm or 800mm would be even better.
For large mammals in national parks where your subjects are used to people, a range of focal lengths of 200mm to 400mm will usually be adequate.
The maximum diameter of a lens is referred to as the maximum aperture, which is confusing since the number is represented as a f-stop number. Some refer to it as the lens' minimum f-number. Either way, the larger the maximum lens opening – the smaller f-stop number – the "faster" the lens is considered to be since it would correspond to faster shutter speeds. f/2.8 and f/4 would be considered fast telephoto lenses while f/5.6 and f/8 slow.
Faster lenses perform better in low light conditions – faster shutter speeds and lower ISOs – and create a shallower depth of field when used wide open, producing a smoother, out-of-focus background.
Primes are lenses with a fixed focal length, for example, 400mm or 600mm. These lenses are best for small birds or timid animals at a distance, such as snow leopards in the Himalayas. Being constrained to only one focal length, you will have a problem if the animal you're shooting moves closer to you. You'll have to zoom with your feet or change lenses and possibly miss shots.
Zooms offer a range of focal lengths in a single lens – 100- 400mm, for example - and give more flexibility for the problem I just described – you can zoom out and not worry about changing lenses and missing shots. There are also more opportunities for creatively framing your wildlife subject in the viewfinder. If you plan on doing photography from a fixed position where getting closer or farther away is not an option – like a vehicle, dock, or large cruise ship – a zoom lens will serve you much better for that reason.
It used to be true that prime lenses were considerably sharper than zooms, but it's not necessarily the case anymore. If there is much of a difference, prime lenses are not worth the lack of flexibility zoom lenses can offer.
Since telephoto lenses have an extremely narrow-angle of view, they exaggerate and amplify any movement or camera shake, leaving you with an unsharp of a blurry photo. This is best tempered with faster shutter speeds, solid tripod support, and image stabilization or vibration reduction in the lens.
Each lens has its own name for its proprietary technology, but by whatever name, it's highly recommended that this switch is turned ON, even if you're using the camera and lens on a tripod. Depending on the make and model of the lens, these features can reduce shake and allow handholding of the lens by 5 stops.
A lens can have all the technical specifications you like, but if it doesn't feel right in your hands, you won't be nearly as productive as you might hope. Notice where your hands naturally sit on the lens when you hold it to shoot, where the AF/MF switches and zoom ring are located in relation to where you might hold it. Is the lens too heavy for you to operate or even carry around? The lens – and camera also – need to feel comfortable and intuitive as if it was an extension of your own hands. If you're not sure, rent one for a week before you invest.
If you already own a telephoto lens and think about replacing it with a longer focal length, consider a teleconverter first. Tele-converters -also known as extenders or teleconverters - are lenses that fit between the camera body and your existing telephoto lens. They increase the focal length of the primary lens. The magnification effect depends on the converter's multiplication factor, usually 1.4x, 1.6x, or 2.0x, depending on the particular model. For example, if the primary lens is 300mm, adding a 1.4x teleconverter will magnify the focal length to 450mm, and a 2.0x model will result in a focal length of 600mm.
If this seems too good to be true, it's because teleconverters do come with a couple of drawbacks. First, adding a teleconverter results in a loss of resolution and image quality. If the lens and teleconverter are properly matched – ideally the same lens brand - the loss of quality might be small, but it's still real. Also, using a teleconverter reduces the maximum aperture of the primary lens. Two examples would be a 1.4x teleconverter cuts the widest aperture by one stop while a 2.0x does so by two. A 300mm f/4 prime lens becomes 450mm f/5.6 with a 1.4x extender and a 600mm f/8 with a 2.0x. Not all lenses are compatible with teleconverters, and you may lose your autofocus too, depending on the camera system and the maximum aperture of the lens being used. You'll want to research that before purchasing one. Some newer telephoto zoom lenses have built-in teleconverters, which can engage with the simple flip of a switch on the lens. This is more than just a convenience. This saves valuable time from switching lenses or adding a teleconverter, which might make the difference between getting the shot and missing it.
Filters are not nearly as important with wildlife photography as they are in other genres, such as landscape photography. Still, there are some shooting situations when they can be a helpful addition to your camera bag.
One filter that can be especially useful when shooting wildlife is a polarizing filter. A polarizing filter removes glare from wet surfaces, which can help when shooting wet animals whose skin or fur produces intense glare and reflections. For example, wet seals reflect a lot of distracting glare that a polarizing filter can help eliminate. Removing glare from water surfaces can be another situation where the polarizer is helpful. The downside to using one is that you lose approximately two stops of light when a polarizing filter is added. Wildlife photography is so often about speed and available light, so it's critical to understand the balance between the need for polarization and the need for speed for each situation.
Neutral density filters are darkened optical glass pieces that absorb some of the light before reaching your camera's imaging sensor. In other words, they purposefully reduce light to get longer shutter speeds. This is hardly helpful for most wildlife photography situations, but if you want to capture the illusion of motion with an animal or bird by panning the camera, you might need a neutral density filter to get that desired shutter speed.
If your telephoto lens has a front element size of 77 millimetres or smaller (a 300mm f/4 or 100-400mm lens, for example), you should use a screw-in polarizing filter attached to the front of the lens. For larger lenses - 400mm f/2.8, 500mm, 600mm, and 200-400mm f/4, as examples - there's a filter slot near the lens base for a drop-in filter.
Now let's recap what we just read:
The lens is the single most important decision when purchasing wildlife gear.
A telephoto lens is your most essential tool when photographing wildlife.
Prime lenses have a fixed focal length, so you must zoom with your feet. Zoom lenses allow for much more flexibility and creative compositions.
Lenses with a large maximum aperture are considered fast since they correspond to faster shutter speed, particularly in low light.
If you don't know a lens, rent it before you buy it.
Use Image Stabilization or Vibration Reduction on your lens.
You want a telephoto lens that is comfortable in your hands and is not too heavy.
Tele-converters can extend the reach of your lens but cost you some available light.
Filters, while not necessary, can be helpful in limited situations.
Accessories
In this section, we're going to discuss a couple of extra gear gadgets and important accessories that can help you with your wildlife photography.
STABILIZATION WHILE TAKING PHOTOS
Hand-holding the camera and lens is a good strategy if the camera and lens are small and light, you're in a vehicle or boat, or you need the ability to move the camera quickly and decisively. Birds in flight come to mind for this situation. But aside from these exceptions, you should try to work on a tripod for the sharpest possible images and avoid physical fatigue in the arms and shoulders. Let's discuss some options for keeping your camera gear stabilized and safely supported when shooting in the field.
A sturdy tripod is the best camera and lens support for wildlife photography. Not only will a tripod help get you those tack-sharp images you're after, but it will also help support those heavy telephoto lenses you will often need over long periods.
When choosing a tripod, here are the things you need to consider.
Steel, carbon fiber, and aluminum are the three choices you have with construction material. Although more expensive than the other options, carbon fiber is considered the best because of how strong, rigid, and light it is.
When using large, heavy lenses, you have to consider the tripod's load capacity in terms of weight. Calculate the weight of the heaviest camera and lens combination you'll be using, and then look for each model's tripod manufacturer's load capacity rating. Many lightweight tripods with skinny legs won't be appropriate for the gear needed to do serious wildlife photography.
You also want a tripod that will raise your camera and lens to eye level while standing. This is important if you happen to be tall. Wildlife photography requires patience and waiting for long periods. Don't be bent over and uncomfortable looking through the viewfinder for long periods because your tripod's maximum height is too low. Check the specifications before you buy one.
You should also consider the physical size of the tripod when it's fully stowed. In the tripod manufacturer's specifications, this is called the folded length. Some tripods have three-leg segments, while others have four. Tripods with four-piece legs can stow to a smaller size, much more convenient for travel, fitting inside a suitcase, or strapping onto a backpack.
Most tripods sell as legs only, without a tripod head. The head is what fits on the top of the tripod and connects to the camera or lens. There are only two serious options for wildlife photographers: a ball head and a gimbal head.
A ball head is like a ball-and-socket, with the camera or lens attached to a locking platform on the actual ball. It gives photographers a tremendous amount of freedom of movement for fast-moving animals and birds. They are small, compact, and intuitive to use. You can lock the ball head into a particular position for ultimate stability or leave the tension slightly loose so you can change direction at a moment's notice.
The purpose of a gimbal head is to create a perfectly balanced big lens and camera combination that easily allows both horizontal and vertical movement on a tripod with little effort.
As we now know, super-telephoto lenses are extremely heavy and difficult to maneuver. Handholding them for anything more than a few seconds at a time is impossible. Most ball heads aren't strong enough to safely hold up a 400mm f/2.8, 500mm f//4, or 600mm f/4 lens with a camera attached, so the gimbal is the only real option. Once the lens and camera are set up and properly balanced on the gimbal head, you can move the combination with only a finger.
Another camera and lens support option is a monopod. It's basically a single pole that is used to support a camera and lens. It lacks the ultimate stability of a tripod and since it's not freestanding. You can't take your hands off the camera and lens. A monopod does offer more stability than mere handholding, and it supports the weight of heavy super-telephoto lenses. A monopod also allows quite a bit more maneuverability and portability than a tripod, which is a great advantage with fast-moving wildlife.
When trying to shoot from a car or vehicle, a bean bag can stabilize and a cushion between the hard window opening and the lens material. You buy the bags empty and fill them with beans, rice, or Styrofoam beads for loft. The heavier the fill, the more stable and solid the bag will be. With the window open, you place the beanbag in the window opening and set your lens on the bag. The filling inside the bag will settle, creating a nice cradle for the lens to fit into.
USING FLASH IN YOUR PHOTOGRAPHY
The vast majority of wildlife photography is done with natural light – the light from the sun and nothing else. But there are times when some extra help is needed with illumination in the form of electronic flash. An electronic flash is a burst of artificial light used to illuminate a dark photographic subject. Some cameras have a built-in pop-up flash on the camera, but a dedicated flash unit is a much better option for wildlife.
When are some situations when flash could be used to improve the light? Here are a couple of scenarios:
You might have a backlit animal - the sun is behind your wildlife subject - but instead of letting details in the animal go black to create a silhouette, you want to keep some details. A burst of flash can reveal details in your subject's darkened areas without changing the exposure anywhere else in your image. In other words, it helps balance out the light in the scene.
Later in this post, we'll discuss why catchlight – think, gleam in the eye -is important with wildlife portraits. Using a flash can create an easy and natural-looking catchlight.
A dedicated flash unit sits atop your camera and connects via the hot shoe. Depending on the specific model - each camera manufacturer offers a few different options and features - it's more powerful than any pop-up flash. It provides more options for the wildlife photographer. You can also take the flash unit "off-camera" with a dedicated TTL sync extension cord for a slightly different light angle. The flash unit and camera should be of the same manufacturer for the most consistent results.
Electronic flash has limited reach in terms of distance, presenting a problem when using a telephoto lens. This is when a flash extender could be used. An extender fits onto the front of the flash unit, concentrating the power of the flash with a Fresnel lens, which extends its effective distance. If you plan on using electronic flash for wildlife photography, a flash extender is an essential item. Some good options are the Magbeam Wildlife Kit by Magmod and the Better Beamer by Visual Echos.
When using a large, super-telephoto lens, such as a 500mm or 600mm model, you should also consider using a flash bracket to mount the flash a few inches above the lens. It raises the light source just enough to prevent red eye in your wildlife subjects and provide more depth to the image. You will need an extension cord to connect your flash unit to the camera when using a flash bracket and a TTL - through the lens - sync extension cord for a flash unit.

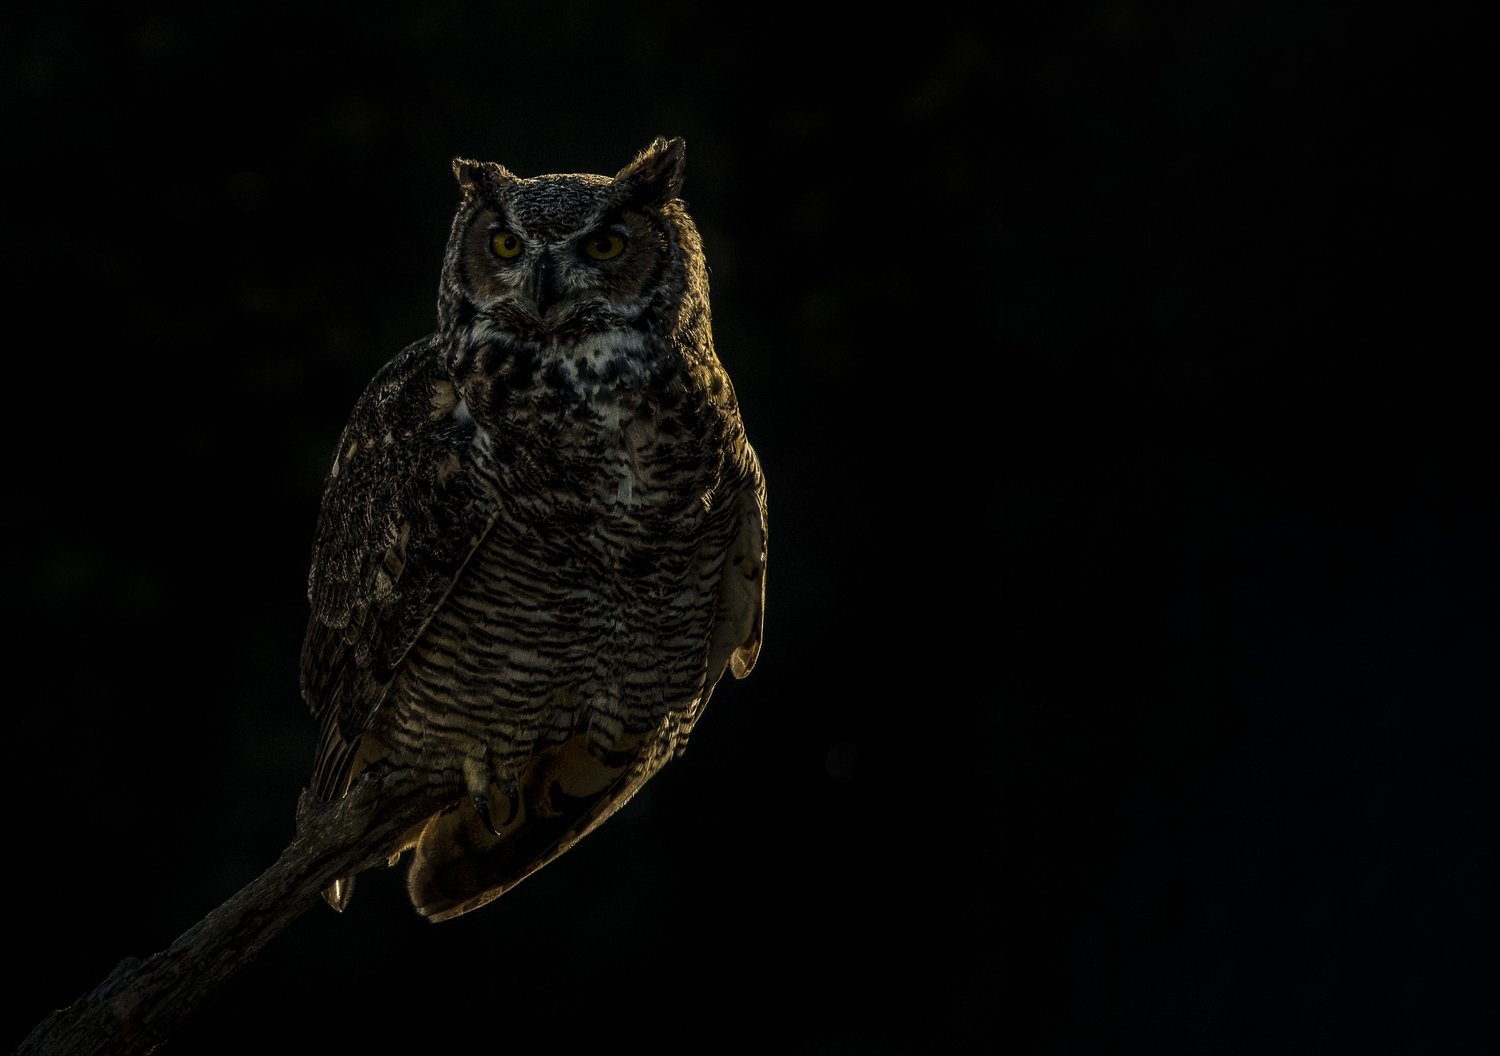
Great Grey owl in Ontario during the autumn season.
Settings For Wildlife Photography
Shutter Speeds For Wildlife Photography
For wildlife photography, shutter speed is probably the most important element out of the exposure triangle. Taking action-loaded wildlife scenes with a slow shutter speed will never work unless you are panning or looking for some artistic motion blur.
It always depends on the movement’s intensity, but I would recommend setting the shutter speed to at least 1/1200 of a second. In most situations, you might even need a much faster shutter speed. I generally photograph in manual when photographing wildlife. My shutter speeds are always set to a minimum of twice my focal length (shooting at 500mm, my shutter speed is a minimum of 1/1000th of a second) when photographing animal portraits of slowly walking animals.
Running animals will have me set my shutter speeds between 1/1000 to 1/1250, flying birds from 1/1600 to 1/2500, and small, fast-flying birds at 1/3200. I will then adjust my aperture and ISO based on lighting.

In this photo, the flight of a Northern gannet required at least 1/1600th of a second. If I was at 1/1200th of a second, there would be some motion in the wings. It’s always better to be safe than sorry, so set the fastest shutter speed possible.

In this photo of the Wildebeest migration across the plains of the Serengeti, I wanted to convey a little motion as the dirt kicked up around the herd. I had already taken a series of images at 1/2000th of a second to freeze all the action. In this photo, I slowed the shutter speed down to 1/320th of a second and panned with the herd. The end result was minor leg movement and the rest of the image was tack sharp.
My general go-to setting for wildlife photography is 1/2000th. For me, that’s an absolute go-to if I have enough light. You can shoot anything with that setting. From birds in flight to animals running in Africa, to absolutely anything. It will cover you for any movement you make, to swaying of a boat, or a vehicle you may be in. It’s a perfect go-to setting, especially with the ISO capabilities of today’s cameras!
Selecting the Right Aperture
Using a long zoom lens with a relatively wide aperture can have many advantages in wildlife photography. Wider apertures produce narrower depth of field, allowing the subject to be isolated from a busy or uninteresting background by blurring the background with beautiful bokeh. Of course, you must take care to keep the critical parts of your subject sharp, with careful attention to where you are focusing. Going “wide open” means using the widest aperture that your lens supports, usually ƒ/2.8, ƒ/4, or even ƒ/5.6 for some zoom lenses. For smaller animals, this will often result in the entire animal being in focus. For larger animals, the photographer should ensure the eyes are in focus, with acceptable depth of field—typically extending at least from the nose back to the ears (left). Sometimes, this requires selecting a narrower (smaller) aperture than you would for a smaller animal.
With groups of animals, using a wider aperture can isolate one animal from the rest of a group (right). This can help produce a feeling of depth in a line of animals, or emphasize a behavior. Sometimes though, a photographer wishes to ensure all animals in the group are in focus. A solid understanding of depth of field, and how it is influenced by various factors, can help you make choices that best match your creative vision. Understanding depth of field at various settings Depth of field (DoF) is the distance between the nearest and farthest points in an image that appears sharp. Depth of field is affected by three factors: focal length of lens, aperture, and distance to subject. As the focal length of a lens is increased, the depth of field becomes shallower. Wider apertures also lead to a shallower depth of field, as does a decreased distance from your subject. Conversely, shorter focal lengths, narrower apertures, and a longer distance to your subject mean greater depth of field.
While these generalities are easy and helpful, the math behind calculating the actual depth of field can be complex and impractical in the field unless you have tools to help with the calculation. One such tool is an app called PhotoPills. This app offers a wide array of tools for photographers and can be a relatively quick way to calculate complicated things like depth of field and hyperfocal distance. Let’s use PhotoPills to calculate some depth of field examples. The image at left depicts the PhotoPills depth of field calculator, which allows you to input camera model, focal length, aperture, and subject distance to calculate the depth of field. The image at right depicts the PhotoPills depth of field calculator showing both the near and far limit of the depth of field based on focal length, aperture and subject distance. On the next page, there’s a table with depth of field calculations at various focal lengths, apertures, and subject distances. Examples are from a full frame camera.
Obviously, the combinations of subject distance, focal length and aperture are limitless, and these tables are just a few samples to illustrate the key points. I encourage photographers to use an app like PhotoPills to explore the various depth of field for their own lenses at varying subject distances
Aperture setting for photographing large animals. When photographing small single animals, wide apertures will generally lead to the entire animal being in focus. This can also be true when shooting a side profile of larger animals. Smaller apertures are needed when shooting a larger animal head-on if sharp focus is desired from the tip of the nose to ears (the longer the nose, the more this is true!). For example, if you are photographing the face of a bear at 500mm that is 13 meters away from you, an aperture of ƒ/5.6 is going to result in a depth of field of only 22 cm. This won’t be enough to have both the eyes and snout in focus, so a smaller aperture is going to be required to get its entire face in focus. Much smaller apertures are needed if you are looking for the entire length of a large animal to be in focus as it approaches you directly.
Aperture setting for photographing groups of animals Wildlife photos of groups of animals can be quite compelling. Showing the interaction of father and cubs or highlighting group behaviours and interaction often makes for high-interest photos. While narrow depth of field can be useful for isolating an animal in a group, sometimes the photographer wishes to have all animals in a given group in focus. In this case, the aperture must be made small enough to achieve the desired wider depth of field. When I am shooting groups of animals, I adjust my aperture as I shoot, using a few basic observations.

First, how many animals are there in the group? More animals generally mean they are staggered at greater depth and will require smaller apertures to capture them all.
Second, how close are the animals, and how long of a zoom lens am I using? If I am shooting using a relatively wide-angle lens, say my 24-70 mm, depth of field is usually not an issue. But if I am using a 500 mm lens and the animals are only 20 m away, I know that I need quite small apertures to get a group of animals in focus.
Based on these factors, I will make my decision on which aperture setting I wish to use. An aperture of ƒ/7.1 or ƒ/8 with a smaller group of smaller amount of stagger in their positions. ƒ/9, ƒ/11 or ƒ/13 when there are more animals and more stagger in their positions. I’ll go as high as ƒ/16 or ƒ/18 for a group that spans a significant depth or when they are particularly close when using a long zoom lens.
If a group of animals is stationary, I will often take a series of photos in quick succession using smaller and smaller apertures. Once I download to the computer, I can choose which setting has the optimal sharpness.
If I am photographing an action shot of a group of animals, I will often work with a smaller aperture to keep them all in focus (or at least all animals that are involved in the action. Of course, this must be balanced with a higher enough shutter speed to freeze the action!
My primary creative decision when shooting wildlife, apart from framing and composition, is choosing the aperture setting. Sometimes that will be wide open to isolate a single animal, but for groups of animals or large animals, I have to constantly remind myself to make my apertures smaller to maintain an adequate depth of field. I will then make sure that my ISO is adequate to allow me sufficiently fast shutter speeds for the image I’m trying to obtain. When shooting wildlife, some guidelines I go with are 1/320-1/500 sec for relatively stationary animals, 1/1000 – 1/1600 sec for faster-moving action, and 1/2000-1/2500 sec for very fast action like birds in flight.

Things To Remember In The Field
PATIENCE
I hear the comment all the time. “How long did you have to wait to get that shot? You must be really patient.” I am patient. But to be honest, I am rarely when it comes to my photography. Maybe I should be more patient when it comes to taking photos. It's just not in my DNA. I will never be the photographer that sits in a blind all day waiting to get the shot of a loon chick on a mom's back in the perfect photographic setting in the reeds.
I prefer to keep quietly moving and observe wildlife behavior in an area that I am in. When coupled with my previsualization research I look for vantage points that I want to be photographing from to help me be better prepared to get the shots I want. My method also allows me to see more of the area, appreciate the beauty of nature, and often offers me the opportunity to photograph other local species as I move around.
You will often find me GPS marking locations as I move around. As I mark these locations I am checking available light at these vantage points. I always pay attention to light and how it illuminates a scene (more on this later). This method will allow me to be ready to use the lighting to create more impactful images.
I will make several return visits to the same location to observe the wildlife patterns. You will be surprised how habitual an animal is in its environment. Hunting the same areas at the same time of day, using the same areas to rest in. This method has served me well over the years. It might work for you, but then again, you just might have more patience than me and be happy to sit in that blind waiting for the perfect moment.

COMPOSITION
Composition is probably the most important creative element in your photo. Without a good composition, Your image will not have a visual appeal. There are some basic composition rules that will instantly make your photos better. Once you apply these basic composition guidelines you will be able to go to the next level and start to master wildlife storytelling.
Here are a few basic composition guidelines which will make your composition much more appealing in almost any situation.
Shooting wildlife at eye level – Doing this makes the person looking at your image feel like they were right there with you while you took the photo. It also separates your images from other photographers that took a photo just standing and looking at the wildlife. Not all wildlife photos should be at eye level, but it is certainly a composition that makes you feel connected to your subject.
The rule of thirds – The rule of thirds is part of a more fundamental visual aesthetic called the Golden mean. This ratio is found throughout nature, music, the visual arts, even the human body, and in patterns of behavior. The 1 to 1.618 ratio is accepted as a principle of good design and has been employed by designers going back as far as 300 B.C. when Euclid mentioned the golden mean in his writing of Euclid's elements
As it applies to photography, the rule of thirds states that when an image frame is divided up into three equal segments, both horizontally and vertically (think like a tic tac toe board) there is an aesthetic value in placing important visual elements on one of the horizontal or vertical lines, or when two of these lines intersect.
1 – The images focal point
2 – The primary wildlife subject
3 – The horizon
The intersection of where the horizontal and vertical lines meet is called PowerPoint, and it's a good place to start when trying to decide where to place your wildlife subject and focal points. If you're working the wide environmental wildlife scene, try placing the subject on one of the intersecting points. it's a wildlife headshot, place the eyes or prominent facial features 1/3 of the way from the edge of the frame. If there's a horizon between land and sky or water and land, try placing the Horizon 1/3 from the top or ⅓ from the bottom.
Just remember, if you follow the rule of thirds consistently, your wildlife images can quickly become boring and predictable. The greatest virtue of the rule of thirds is in helping you decide where to place your subject within the image frame. It's a good place to start, but if it doesn't work, you can try something else.
Use the rule of thirds as a guide when you're unsure where to start, but sometimes, breaking the rule is a better option. Exceptions to the rules are often the most visually engaging photos but don't break it just for the sake of breaking it, break it because it's better. What’s better? Well. that is up for you to decide, after all, art is an expression of your own personal vision.

Using Negative Space In Your Images
Negative space is the area that surrounds the main subject in an image. In this context, the main subject, or animal, can be referred to as positive space. Just as important as the main subject itself and its positive space, the negative space helps to define the boundaries of the positive space and brings essential balance to any image.
In layman's terms, negative space is the “ breathing room” around your wildlife subject that determines how balanced and pleasing the eye image looks and feels. negative space helps emphasize the primary subjects in the photo, which naturally draws the eye of the viewer. If there is not enough negative space around your animal, it may appear cramped and crowded by the image frame. If you allow for too much space around your subject and it feels out of balance.
Mozart once said that music was not only about the notes of themselves but the silence between the notes. This is also true with the negative and positive space in photographs. A good exercise on the art of creative visualization is learning to ignore the primary visual element in the scene and instead concentrate on the gaps and empty spaces between them. This forces you to pay more attention to the negative space, where the negative space is, and how it relates to the main subject or subjects in your photograph. In turn, this will help you see lines, shapes, and areas of visual weight much more clearly, And how they relate to each other and the image frame itself.
When it comes to space and spacing in general, you usually want to leave enough room between the important elements so they don't merge together. Let's say you have a group or herd of animals in a photograph – You want to compose the scene so there are some empty spaces between each of them. The space has become as much a part of the pattern as the animals themselves. This is also true with regard to silhouettes, where any merging between important elements could destroy the integrity of the subject's shape or shapes.

Professional wildlife photographers know and understand that the image background is every bit as important as the subject itself. Wildlife photos with distracting or mess backgrounds lose visual impact by having the primary subject blend into or get lost in the background distractions. Make sure the negative space around your primary subject is ample. It will not feel cramped, and you will minimize any unwanted tangents in your image.
Focus on the eyes
Anytime you greet someone new, you shake their hand and look them in the eyes. Wildlife photography is no different. You’re not going to reach out and shake the lion's hand, but you are going to look them in the eyes, just as someone does when looking at the photo you take.
Biologically, we humans have a visual system that is hardwired to immediately train on an animal's or fellow human eyes. Whether it's a portrait of wildlife or a person, the eyes are the initial focal point in the image and where the viewer's attention is first drawn too. The viewer of your image will immediately lose interest if the eyes are out of focus, or are blurry.
During the capture, if the eyes are clearly visible through the viewfinder you want to position one of the camera's focus points directly on the eye, or the eyes. If the animal or bird is looking 90° to one side and the focus plane of the face is approximately 90 degrees from the angle of the camera and lens, everything should be reasonably sharp even at f4 or f5.6.
But, if the animal has a long snout or a bird has a long beak, or it's looking directly into the camera, the nose or beak could be unsharp when you focus on the eyes. In this case, you should stop down your lens to f11 or f13 to get all of the face and focus. But then again you might like a shallow depth of field and selectively focus on only the eyes. If the face or body of the animals is only partially in focus, the image will still work as long as the eyes are Sharp.
When the animal makes eye contact with the lens and camera, it becomes easier for the viewer of the image to make a connection with your subject. That connection will only happen when the eyes are sharp. That said, even if an animal is looking in a different direction, the eye or eyes must still be tack sharp for the photo to pass your litmus test.
In portrait photography, you may often hear, “The eyes are the window to the soul”. I want you to begin to think about an animal’s eyes the same way. Eyes show an animal's fear, sadness, anger, and even happiness, and if you can capture that emotion, your viewer is going to have a positive reaction to your photograph.
Portrait Versus Environmental Photo – Depending on your distance from the subject, you can choose to create a portrait or shoot it along with the environment it is in. Both options can create an impactful image. But the decision is often based on light, backgrounds, and other items visible in your viewfinder. If there is good light on your subject and not on the background try a portrait. If the background is amazing and compliments your subject, It is always preferable to try both in the moment, and take a look at them on your computer monitor.
Do not cut off body parts unless it's intentional – This is so easy to do. We get so fixated on the body or face of the animal, we forget about the tail, feet, or wings as a bird is flying.
I often take a quick scan in my viewfinder to watch to make sure I am not cutting any body part off in the frame. Eliminating this could be as easy as photographing the animal a little wider and cropping it to the desired composition in the editing phase.
Avoid Tangencies – The word tangent usually indicates that two things are touching, but in photography, the term describes shapes that touch in a way that is visually bothersome. When creating a composition, there are so many different things to juggle that it's easy to miss even the obvious flaws—and that's when unwanted tangents sneak in.
As I mentioned in the previous composition tip, I often take a quick scan of my viewfinder to look for tangents. Eliminating them could be as easy as moving to another vantage point
Wildlife photography composition has so many little things to remember. But the more you practice, the more you will subconsciously pay attention to them without thinking about it.
UNUSUAL PERSPECTIVES
Wildlife composition usually involves capturing the whole animal in action. They may be running, hunting, fighting or flying and the typical goal is to capture that action.
However, don’t ignore interesting close-ups of intricate details. Maybe it's the scales or an alligator, the horns of a bison or the claws of the lizard. Your camera can provide a window into these details that a viewer wouldn’t normally appreciate.
BACKGROUNDS
Wildlife photos can be ruined because the backgrounds are cluttered, distracting to the viewer, or just plain ugly. An example, black bears on a seashore can be beautiful… black bears at the local dump just seem wrong. It is just far less natural and not inspirational.
A general rule to follow… “Anything that does not make my photo better makes it worse.”
This does not mean you can’t take a good wildlife photo at the zoo. You just need to manage the setting. A good tip to remember is the following. If your background is spoiling your shot, zoom right in on the subject to eliminate as much of the background as possible.
By zooming in, you will also reduce the depth of field to a minimum, so any background that does appear in your photo will be out of focus and less distracting.
On the flip side, a wildlife photograph that captures the subject in a beautiful natural setting can be even more effective than a simple close-up. This is my preferred way to take a wildlife photo. My inspiration comes from the paintings of Robert Bateman, a fellow Canadian.
Robert pays less attention to the detail of the animal and pays more attention to form, light, and space. His ability to create a painting that conveys a sense of place for the animal is inspiring to me. His use of negative space and the indigenous flora and fauna to convey a sense of space allows him to create images that I find appealing. Robert also uses neutral tones in his art. He holds back extreme whites and blacks in his paintings, and only uses these extremes when he wants the eye to focus. I identified with that aspect of his images, and you can see that inspiration in many of my images.
Let’s look at an image I took. I want to use a few examples to help you better understand how I approach backgrounds. How Robert inspired me, and how my style was born out of my inspiration for his work.

This is one of my all-time favourite images by Robert Bateman. During a trip to the Great Bear Rainforest, I was in a very similar setting. I could have easily created an image identical to his. Instead, I chose to create my version of a black bear coming out of the darkness.

WILDLIFE AND BIRD POSITIONING
How you choose to photograph wildlife is based on personal preference. You may like animal portrait images, maybe lots of action. Each has its merits. But it is the subtleties of an animal's movement and the story that you tell that will separate your photos from others. How the paws or hooves are positioned. How is the head in relation to the body? Is movement being introduced in your image? What feathers are predominantly displayed? Are there distracting tangents? Is there an interaction between multiple animals? How do you showcase the environment the animal is in?
We have gathered together a sample of wildlife and bird images in order to allow you to compare body and wing positioning to help you begin to understand your personal preference and learn to tell a better story with your wildlife images. While you are looking through these images we are also going to point out some of the subtleties that we watch for in our own wildlife images.
Our first set of images was taken on a workshop in Nunavut Canada. We traveled by plane to a remote lodge hundreds of miles from civilization where the tree line ends and the sprawling tundra and eskers form south of the arctic circle.
Here is a photo of a Caribou grazing in the tree line. His head down. You cannot see his eyes and the hooves are hidden behind the mound. If this is the only image you could get on your trip, it will suffice. But it really doesn't showcase the animal or the glorious landscapes we were in.

Here is a better image. Notice that the head is up on this caribou, the antlers are on full display and the caribou is looking off into the distance. It's a great portrait photo that shows off the colorful ground cover in Northern Canada.

Here is an even better image of a Caribou in movement as it walks through the Tundra. The photo was taken as one of the hooves is visible. This shows motion. The rest of the hooves are also not behind a mound like they were in a previous photo. This caribou was photographed because antlers have lost their velvet and visible blood covers them. It helps tell a story that the Caribou was photographed in the fall when they are entering the rut before winter. The head of the Caribou is elevated and in a relaxed state, and the eye is visible. There is the perception of movement in this image, and the animal is placed nicely in its environment.
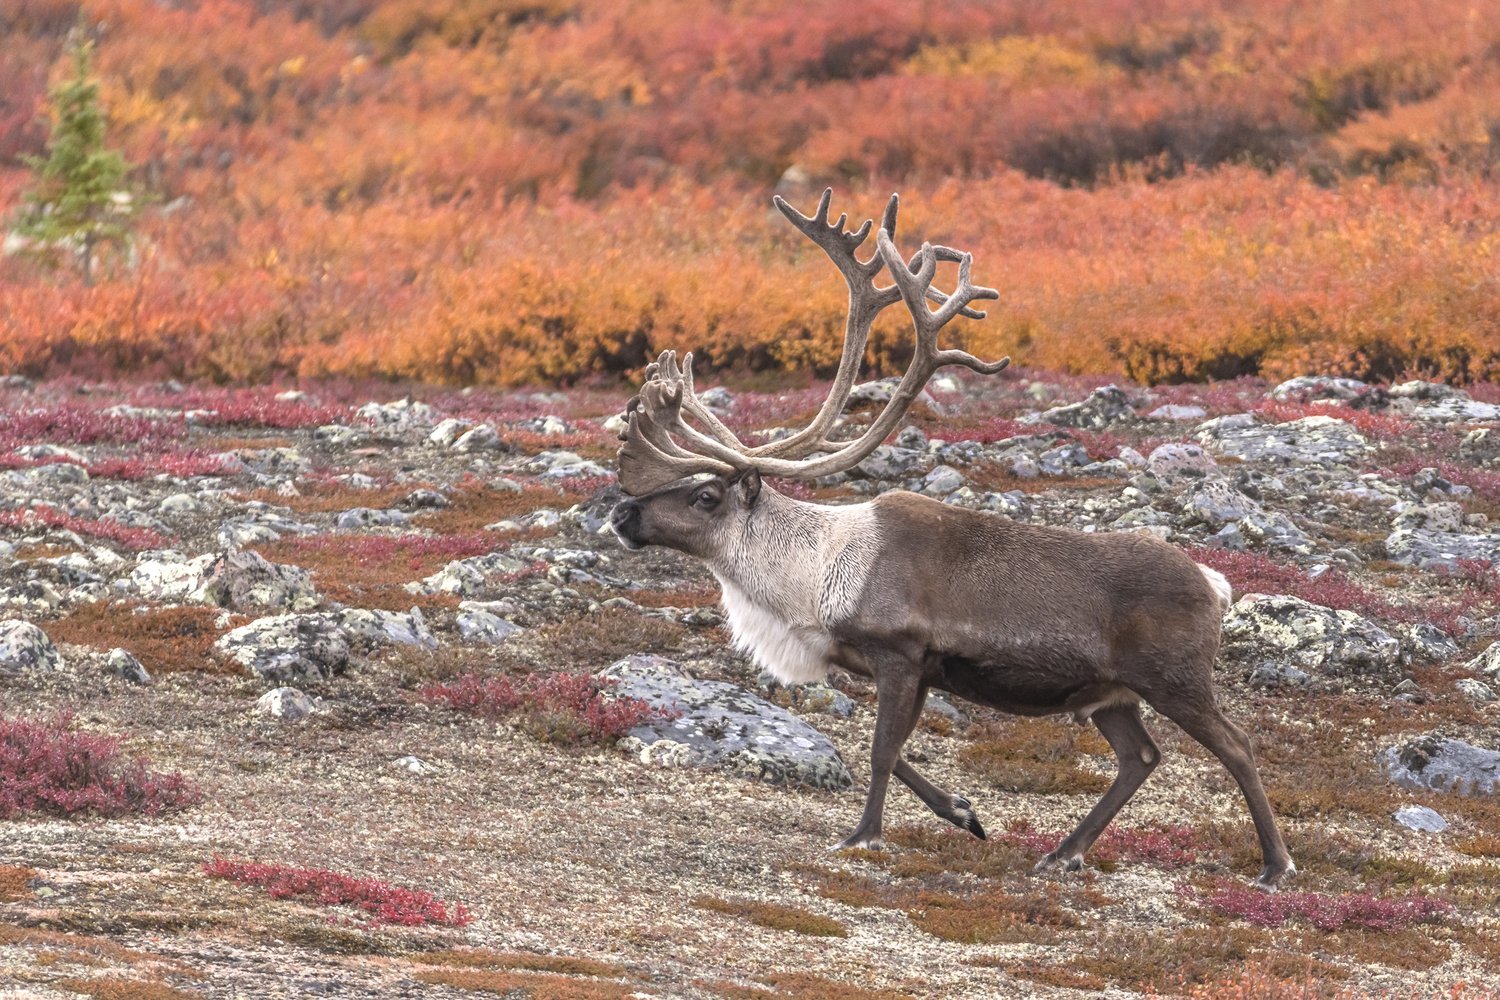
Then we have these two photos of two animals in the same frame. One of two Caribou standing there in a beautiful autumn setting in Northern Canada. Both Caribou are looking at the camera. The Caribou is in a gorgeous setting of fall colors, and both are in focus. While one caribou is great, two caribou can be even better. The second photo is of two wild Musk Ox that is standing in a beautiful scene. While one animal is great, two might just be better


You see, there are little idiosyncrasies that elevate the aesthetic appeal of your photography. Head positioning, leg position, clarity of the eye, more than one animal, even the setting can make your image more appealing to the viewer. Watch for the little things. It will create a better image.
Here is a list of quick things to think about when photographing animals.
Elevated head versus feeding
Walking or running with one or more hooves or paws elevated
Are they making eye contact with me? Is there catch light?
Elevated action images like hunting or interaction with others.
Are they doing something humorous?
Adult interaction with young
Here are a few things that I try and avoid.
Do they look stressed? Are their eyes open wider than normal, ears turned forward, maybe their heads are slightly lower than normal. – these are things to try and avoid.
Here is a series of images of a Bald Eagle to show different body and head positioning for you to consider. These images were taken during one of the largest convergences of migratory bald eagles in North America. Thousands of bald eagles migrate to this area to feed on the spawning salmon while they mate in the November/December time frame.
In the first image, we see a bald eagle hovering in the sky. A nice portrait. But it does not tell a story. This image could have been taken at any number of locations throughout North America.

Then we have an image of a bald eagle walking along the shores of the river. It puts the eagle in the location of the river, and experienced wildlife photographers would assume it is at a river to feed. There is good contact with the eyes, The white if the head is not blown out and you can see the details in the feathers. Even the feet are visible.

Here we have a bird in flight. Notice the photo was taken as the wings were stretched to show off the primary feathers, still maintaining contact with the eye. You can also see good detail in the tail feathers. This is a pleasing bird in flight right above the river showing off all the details a viewer would want to see.

Now we introduce the action. A photo of two mature eagles and a photo of an immature bald eagle is challenging a mature bald eagle for the carcass of a salmon. This photo elevates to telling the complete story of bald eagles being at a location during a salmon run. It also shows how eagles interact with each other when a food source is present.
Between both eagles, all the important elements are on display. Wing detail, talons, even the setting of being on a river is shown in this image because the point of view is so low to the ground.


Here is a list of things I look for when photographing birds
Are the wings on full display when in flight? I like or showcase the primary feathers and tails.
Are they making eye contact with me? Do you have catch light present in the eye?
Elevated action images like hunting or interaction with others.
Are they doing something humorous?
Adult interaction with young
Here are a few things that I try and avoid.
Do they look stressed?
Tangents like branches sticking out of their bodies
DO NOT SACRIFICE SAFETY FOR A PHOTO
I think stating the obvious is a good way to start this section. Wildlife is wild. As such they are unpredictable. But that is not the only thing that we need to be cognizant of. You could be far away from civilization, and let’s face it, more than likely out of cell range, and not walking on paved roads. Both the terrain and the creepy crawlies that inhabit the areas you may visit can cause serious, even lethal injuries.
The first bit of advice I would give you is to try not to go out on your own. Take a buddy. I know that is always not possible. But I highly recommend it. My second bit of advice is to have something like an inReach Mini. I discuss that product a little later as one of the accessories we usually take with us when headed out into nature.
Be Respectful of Your Subject
As photographers, it is important to respect all wildlife. The long and short of it is to just use common sense. If you think that you are putting wildlife, or its natural habitat in danger stop what you’re doing and look for an alternative method to acquire the photo.
Here are four categories that I would consider detrimental to wildlife.
Baiting or Feeding - This is often done with food that is not natural to their diet. Human food can be harmful to an animal looking for a free meal. It also habituates the animal to humans. If they view humans as a free meal they might put themselves in harm’s way on roadways or residential areas.
Destroying habitat – Try and practice a “leave no trace” method of being out in nature. When you leave, there should be little trace that you were there. That goes for vehicles. Don’t blaze a trail out into the wilderness and destroy habitat. Park in a safe area and walk in.
Crowding Wildlife – This tactic not only stresses the animal but also impacts the animal’s natural way of life like mating, raising young and hunting.
Provoking animals for movement – This is one of the worst ways to capture a picture of an animal. There is no excuse for putting an animal under such duress in order to take a photo. Wildlife lives on the edge of life and death. They move only when they have to and feed only when necessary. Provocation puts a strain on the wildlife that just isn't necessary.
LIGHTING IN YOUR IMAGE
We have discussed the importance of focusing on, and positioning of your subjects But light can transform a dull image into a brilliant one. Light needs to be used wisely depending on the type of light present, the intensity of light, the direction of light, and the time of the day.
Here are some common lighting situations that could help you create compelling shots.

Backlighting happens when the light source is behind the subject – for example, light during the golden hour when the sun is lower in the sky, almost closer to the horizon. Window light indoors can also be used to naturally backlight a subject indoors.
This means that the light is directly in front of the camera, with the subject in between. This light can most of the time create a silhouette with a hazy feel and not many details on the subject, depending on the intensity and atmosphere present. You will also have some long shadows that can create a dramatic effect in the image.
Rim Light occurs if backlight is slightly moved (or the photographer moves to an angle when it is natural light) to fall from an angle, then this will show details of the subject instead of a silhouette and will have a rim light. Silhouettes also will have a rim light when light is used effectively, but the details in the subject will be lost with a lot of highlights showing up in the edges.
Rim light can beautifully light the edges of your subject separating the subject from the background.

Front Lighting occurs when the light is right in front of the subject, it is easier to photograph, but if the light is directly in front of the subject, it may result in a “flat” photo. “Flat” lighting is light that evenly spreads on the subject and is not at all the desired one for portraits. I try to avoid this because it makes a photo lo I ok two-dimensional; it is the shadows in a photo that create a three-dimensional effect.
Light from above of course is quite common. When you travel, mostly the sun is your light source, and most of the day the sun is right above your subjects. So it’s important to know how the light from above will affect your images, and what you can do to minimize the shadows that the sun from above will invariably create in your subjects.
Early mornings and late afternoons are great because the sunlight is more orange; the angle of the light is also more from the side, especially at sunrise and sunset. But also in the hours right after sunrise and the hours just before sunset, the light is not as harsh as in midday.

Side Lighting is arguably my favorite kind of light. Side light is light coming from the side – that is the left or right of the subject. It was used by the masters of painting—Rembrandt used side light in his paintings to give the picture a three-dimensional effect. When the light falls on one side of the subject, the other side is in shadow. The shadows are what give the picture a 3D look.
Like every skill, seeing the light—its direction and quality—takes practice. But with some basic knowledge of lighting situations, any person with a camera can “practice the right skill” and do what photographers do: stalk that light, capture it, and make it look fantastic.
PHOTOGRAPHING IN THE SNOW
Our winter wildlife photography workshops us in locations with lots of snow on the ground. This often presents a new issue that most people have not had to deal with – how to get good exposure in a completely white scene without continuously messing around with shutter speeds, aperture, ISO, and exposure compensation.
To set exposure in the snow we usually just fill the frame with snow, and adjust the settings in Manual mode, until we see the peak on the camera’s meter indicate that the exposure is now at +2 stops for overcast snow or +1 stops for brightly lit snow.
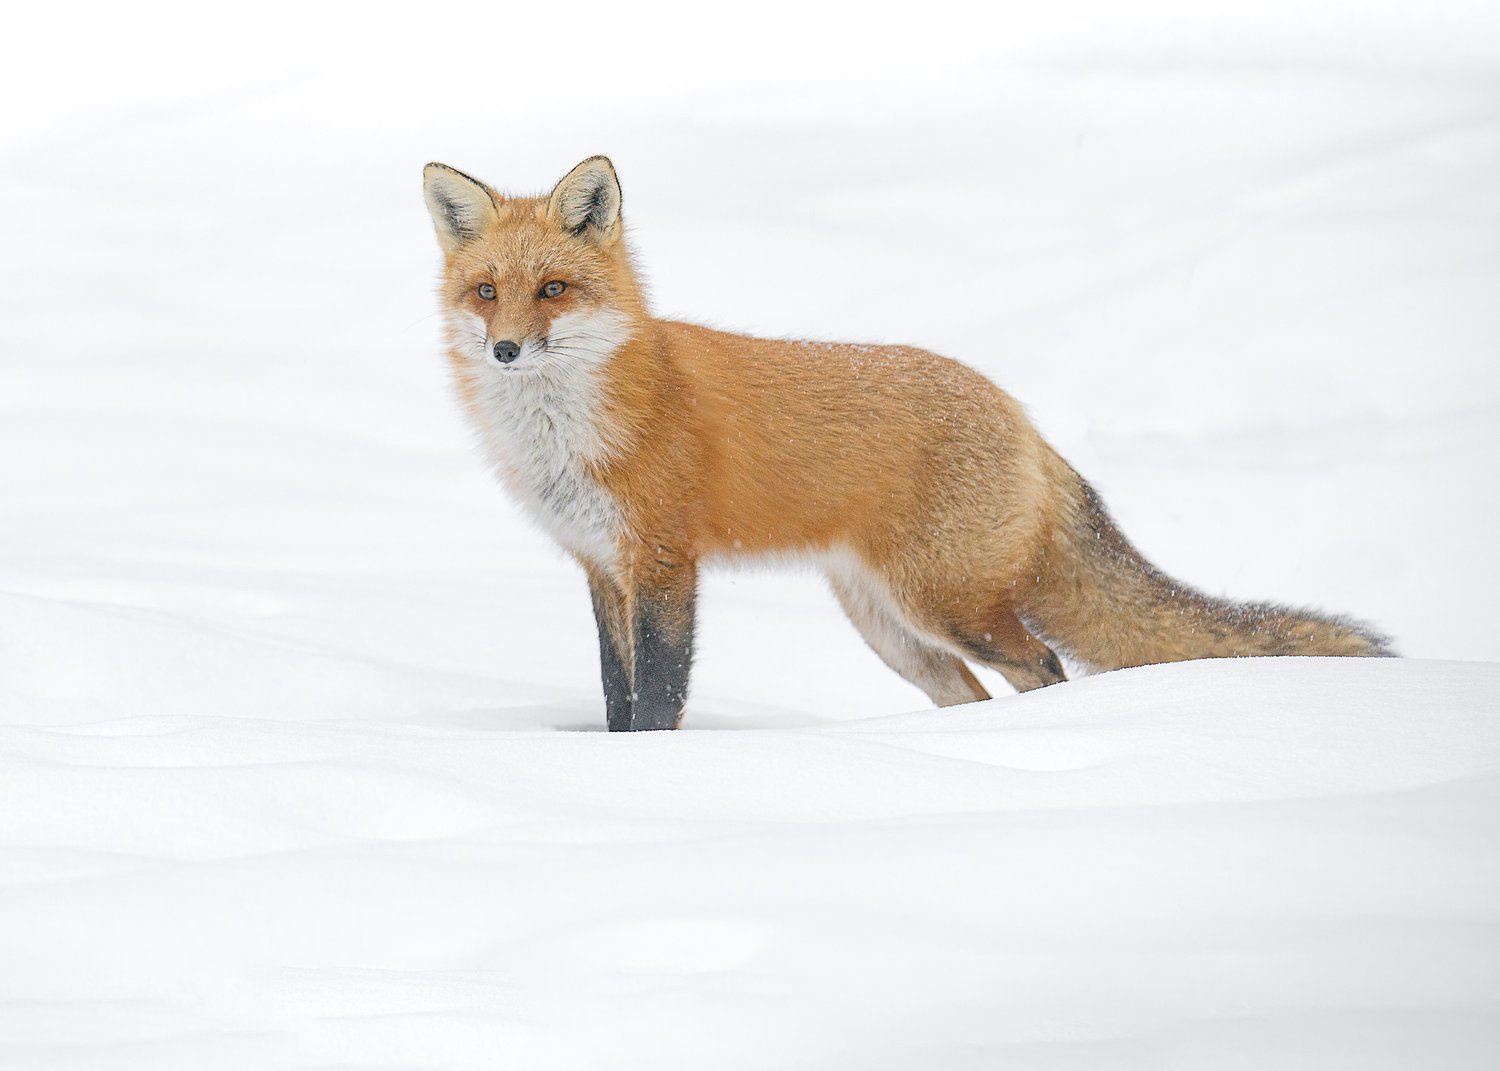
Why is this something we have to worry about? Your camera sees a white scene. The computer in your camera is going to find 18% Grey and dull your image down. When it does this it gives your snow a grey or bluish tone that you don't want to have.
All camera systems are a bit different. Exposure compensation may work in Manual Mode in Nikon, but it does not work on a Canon of Sony. You have to be in Aperture or Shutter Priority for Exposure compensation to be used on a Canon or Sony.
Alternatively, you can adjust any of the three other functions of the camera to overexposure. Slow your shutter speed, but risk motion blur, adjust aperture but risk losing the depth of field or increase your ISO to increase exposure.
The downside of increasing the amount of light in-camera versus in post-processing is that you do have to continually check your exposure, especially on a day of variable clouds. But we would rather get it right in camera and have less to worry about in post-processing.
PANNING PHOTOGRAPHY
Here are a few tips we put together to hopefully take your keepers from one out of five-hundred to one out of one-hundred. Like a lot of photography, panning is a percentage game; one keeper out of one-hundred photos is not out of the ordinary. But, I promise that “one” is worth the effort!

Panning works when you move the camera in perfect synergy with the subject. It’s not enough to just swing the camera from side to side. You have to move it in perfect synch with your subject. Sounds easy, right? “HA, we say…”
Generally, it is easier to pan with a fast-moving subject than a slow one. Animals running sideways to you are great examples. They are moving fast enough that you can pan smoothly with their straight-line motion. People walking or casually jogging are almost impossible; they are too erratic and slow to get much blur, and it’s difficult to pan smoothly.
Whether you shoot in manual, shutter, or aperture priority, the object is the same. You don’t want the shutter speed to change while you are shooting.
Your subject must be in focus. You might like to switch focus to AI Servo mode (in Canons) or AF-C mode (in Nikons). In this mode, hold down your shutter halfway to lock focus on your subject. Without letting go of the shutter, start following your subject with your camera at the same speed. Your camera would automatically adjust focus. You can take several shots at once; the number of photos is dependent on your camera. For you birders, it’s the same principle, keep the focus on what you want to be in focus.
There is no “correct” shutter speed for panning. The longer the shutter speed, the more blurred the background will be, and the higher the probability your image you wanted in focus will blur. A long shutter speed will make your subject pop out from the background, and that is good. It becomes a balancing act. As a starting point, let’s go back to the example of the sprinters running across the picture. Try anything between 1/8 of a second and 1/60 of a second. Beyond 1/8 of a second, it’s really tough to get sharp. Above 1/60 of a second, the camera will probably stop too much action and ruin the effect. Except for faster moving objects like flying birds or jets. Then you might need 1/250 of a second for a bird and 1/500 of a second for the jet, and that brings us to our next problem.
A Fluid, smooth motion is the name of the game. No jerking, no rushing, and done without hesitation. The stance should have you face the subject that you want to focus on or sit on the ground to stop you from moving too much. You then rotate your shoulders to pick up your subject in the viewfinder. Start clicking the shutter before your subjects reach the ideal point and then keep shooting after they pass that point. Good follow-through is imperative. The best panning shooters go out and practice their movements.
There is no right or wrong way to produce the desired results… There are no set rules here to give you. But try it, have fun with it, experiment with camera motion.
Things do not always have to be totally in focus. This type of photography, in addition to showing the motion of an object, can be an artistic type of photography. Technically, you should not be able to have motion in a still photograph. This is a two-dimensional form of art. But the act of panning will force a person to look at the image more closely, and they will until they come to realize: “That’s not a blurry picture; that’s a young boy taking a photo of the dog he loves running in the backyard. That’s cute!”
Now go out, try this, and “pay it forward” so the next person can have their AHA! moment.
MOTION BLUR PHOTOGRAPHY
Often confused with Panning Photography, Motion Blur differs because you are not moving your camera. Instead, you are composing the scene in camera and allowing the wildlife to move through the image.

This method will freeze your background while the subject is allowed to blur. You’ll need a tripod for this technique. You will select a background with some stationary objects and visual interest, but not so much that it’ll compete with your subject.
Put your camera on Shutter Priority and set your shutter speed to anywhere between 1/30 of a second to 1/250th of a second, then adjust to a faster or slower speed as you review results.
Bare in mind that as you decrease your shutter speed, more light will reach your camera’s sensor. This can result in overexposed photos. Your picture will look washed out and will lose detail. To compensate for this you will need to adjust either the aperture upwards to f16, decrease your ISO, or use filters like a polarizer of light ND filter.
Just remember to keep the camera still while your subject moves within the frame, and the end result will give the impression of a moving animal by introducing a pleasing blur.
HEAT DISTORTION
Have you ever taken a photo with a long zoom lens where you thought your technique was perfect, only to come home and see an image that is mushy and seemingly out of focus?
This happened to us on numerous occasions. Two instances come to mind. One when photographing a Grizzly Bear in the early summer in Yellowstone, and the other time when photographing Caribou up in Nunavut in Canada over dissipating dew on a sunny autumn day
You’ve probably seen heat distortion on a hot summer day, where there are waves of heat rising from a road. Or perhaps you have seen it in the exhaust from a boat, train or airplane.
Years ago, when I first came across it in my photos, I thought it was either something wrong with my technique or equipment, but no amount of fancy gear or flawless camera technique can fix photos ruined by heat distortion.
When Will Heat Distortion Occur?
Heat distortion is caused when light is refracted through air of differing densities. Hot air is less dense than cold air, so light waves are bent differently in hot versus cold air. The result is visible heat waves when there is a significant temperature difference between the ground and the air above it.
On a hot, sunny summer day, you will see this above the road, but it can occur on just about any landmass where the sun heats the ground to a temperature higher than the surrounding air such as an open field or beach.
Bodies of water can cause the exact same phenomenon when the water is either significantly warmer or colder than the air above it. A warm ocean with cold air above it may show heat distortion and so will a cold ocean with warmer air above it.
Heat distortion is not restricted to hot summer days. It can also occur in arctic temperatures during winter where the sun warms the land or mountainside to a temperature well above the air temperature.
The further away from the subject of your photograph, the more heat distortion will be present. The further distance means that the light is traveling through more air before it reaches you, therefore it gets refracted more in areas where heat distortion is present.
A long zoom lens usually means you are trying to photograph subjects at a greater distance. That greater distance increases the chance that heat distortion can ruin your images. Heat distortion is most prevalent at ground level.
Zoom lenses have the added disadvantage of bringing the detail of the heat waves closer, making the result larger and more obvious in your photo. Photographers who spend more than $10,000 on a monster 600 mm or 800 mm prime lens will want to remember this before getting angry and wanting to send the lens back for repairs.
How Can You Avoid Heat Distortion?
In many cases, heat distortion is unavoidable and there is nothing that you can do to fix it, but there are a few different ways to avoid it.
Move closer to your subject. Reducing the distance that light travels through the refracted air will reduce the amount of heat distortion that you see in photographs.
Avoid photographing over surfaces that are easily heated up by the sun, such as a road, beach or similar.
Shoot near sunrise before the ground has heated up or near sunset once the ground has begun to cool. There is less or no heat distortion during these times.
If photographing over a large body of water, try to take photos when the air temperature is similar to the water temperature.
Soft, out-of-focus images can be caused by poor technique or the wrong camera settings, but once you have ruled those out, don’t forget about heat distortion.
DON’T PHOTOGRAPH TOO TIGHT
Almost every animal you will photograph has distinct characteristics, not to mention animals do not always stand still. Elephants have their long trunks that are often moving in different directions, peacocks have a beautiful tail that can open quite wide, Owls and Albatross have huge wingspans that can quickly get out of frame as they take to flight.
These characteristics are a major part of the animal’s personality and these elements are not ones you want to crop out of your image. Shoot wider than you think is necessary. The number of pixels in today's cameras will allow you to crop your image to the best composition in post-processing.
Pre-visualize images versus shooting on the fly
Pre-visualization comes from your research. You would have seen an image that you liked while doing your research, and something in the landscape you are in just piqued your interest. This would be an instance of exercising patience and waiting for an animal to walk into your scene before you take a photo.
The number of images you take in this method will be far less. The advantage is you will get that one or two keepers that you really wanted to get. You will also spend less time going through images you took while you took an image everywhere you saw an animal. The disadvantage of pre-visualizing an image, and waiting for the right moment is you can get so focused on one photo, you miss out on all the other possibilities that may present themselves.

Shooting on the fly is more about following the animal wherever it goes. You're going to take many more images this way, no doubt with many keepers after sorting through the hundreds or thousands of images you took
We suggest a mix of both strategies. You are probably on location more than one day, so alternate, get all the photos, pre-visualized, and the ones on the fly.
PHOTOGRAPHING FROM A BLIND
Shooting from a photographic blind can be very useful, particularly when photographing wildlife that is not used to seeing humans in their environment. I do not often use a blind, but there are definite situations where I do. – Photographing local birds – a local fox den – a known area where animals are known to use as transition areas – If you find a carcass in the wild.
Why Use a Blind? – Photographing wild animals is sometimes only achieved by using a blind to hide your presence. If you are not seen, heard or smelled by the subject, you have a good chance to capture behaviors that you wouldn’t otherwise see if they are aware of your presence.
Types of Blinds – Several types of blinds are available for use, including the permanent blind, the temporary blind you can set up using items found on site, and your own portable blind. Each type has its advantages and disadvantages.
The blind that we use is the Rhino Blinds R75 2 Person Hunting Ground Blind. Constructed of a True 150 denier polyester - 150 denier thread in both the horizontal and vertical weave.
The blind is easy to set up and take down - with a little practice setting the blind up can be accomplished quickly in as little as 60 seconds once the blind is out of the carry bag.
The blind is designed to withstand the most inclement weather conditions you dare to be caught in; rain, snow, hail, wind. The blind is treated with a durable water repellent to protect and an antimicrobial to help prevent mold and mildew ensuring you a quality product
The Permanent Blind – The permanent blind is a permanent fixture. The permanent blind is usually built using lumber or some other type of weather-resistant building materials. If you fabricate a permanent blind on your own property, or if you get permission to place a permanent blind on someone else’s property, then a permanent blind can be invaluable. Once installed, it will remain when you are not there. The animals will be more
A disadvantage of the permanent blind is that it cannot easily be moved. If the animal of interest decides to move its location, or the light is not where you want it to be the blind will no longer be beneficial. And let’s face it, most of the time you want to use a photographic blind, it will be on public or private property, where a permanent structure is not allowed.
The Temporary Blind – The temporary blind is one of the most useful. You can carry it with you and set it up wherever it is most beneficial.
Temporary blinds can be as simple as a large piece of burlap or camouflaged material like camo netting strung between two trees. It’s simple to put up, easy to carry, and takedown and can be used to blend in effectively with the local area flora and fauna.
One of the disadvantages that I have found with the temporary blind is that they are something you have to carry around with you. A temporary blind is also not good weather protection.
The Personal Blind – The personal blind is simply a large, camouflaged material that you throw over your body. A lot of people use these and have great success with them. I find it very uncomfortable to have something like a Ghillie suit on my body.
I prefer the personal blind structure like my Rhino blind.
Location of Your Blind – In order to get the most out of using a photographic blind, you have to follow that golden rule of “Location, location, location.”
How do you find the right location? I would go back to the research that we discussed earlier in the book. Look for a location near a water source. Take a hike in an area and look for tracks or other signs of activity like bedded areas in the long grass. Look for feces or skeletal remains. You can also set up a trail camera where you suspect activity. Let the camera sit for a week, then see if this looks like a good spot for a blind.
If you capture wildlife, note the times of the day and plan to set up your blind long in advance of when the wildlife was captured by your trap camera.
Tips for Using the Blind – To get the most out of your blind, here are a few simple rules you should follow.
Get to the location and set up the blind before the wildlife arrives. Pay attention to the direction of the lighting and the background that you will be dealing with. The more preparation ahead of time will help you when the wildlife shows up.
Wait in the blind until the wildlife has gone. If you want the wildlife to continue using this area you must minimize your presence in the wild.
Make the blind comfortable – You will likely spend hours at a time in it, so make it as pleasant as possible. Take bottled water and food with you and use a portable chair/seat (if you have room). You might also want to invest in a disposable urine bag with gel on the inside to soak up your urine. Seems a bit excessive, but it is important that you stay in your blind, minimize movement, and not be seen,
Minimize Movement and Sound – If your camera has silent mode I would suggest you use that. That sudden burst of photographs by the shutter is sure to startle birds and wildlife. If your camera does not have silent mode it may be best to shoot single shots and wait a few seconds between shots.
Leave No Trace – When you are taking down your blind please make sure that you pick up all your garbage and minimize your impact on the environment.
PHOTOGRAPHING FROM A BOAT
Sometimes the only way to access certain wildlife is by ship or boat. Obviously, this is true for marine wildlife, but there are also shore-based birds and mammals where photographing from the water is the easiest or only way to see or access them. Photographing action from a moving boat presents its own unique challenges.
While on a ship, it may be tempting to bring out your tripod. Don’t bother if the engines are running. A tripod will transfer the vibrations from the engine directly to the camera, often confusing the camera’s vibration reduction capabilities. Shooting handheld is the solution to isolate from engine vibration. This same advice actually applies to land vehicles. Don’t use a vehicle for lens support when the engine is running and vibrations can be directly transferred to the camera.
Waves can also be very problematic for photography. I’ve been on a zodiac in Arctic Norway photographing orcas where the waves were rolling the boat up-and-down and side-to-side. Keeping the subject in-frame and in-focus was nearly impossible, and none of the horizons were straight. The waves even crashed over the bow and seawater ruined one of my cameras.
With significant wave action, sometimes the solution is to simply give up your photography and enjoy the wildlife. On a recent trip to Russia’s Kamchatka Peninsula, we took a catamaran to a bird sanctuary island filled with tufted puffins. Puffins in flight are extremely fast and somewhat erratic. Our boat was rolling significantly in some really bouncy seas. I attempted to photograph them, but gave up when I realized that the motion of the boat exceeded my ability to focus on the puffins and keep them in the frame.

Consider A Wildlife Photography Workshop
A photographer should consider going on a photo workshop for several compelling reasons:
Access to Stunning Locations
Photo tours often take participants to picturesque and unique locations that are ideal for photography. These places might be off the beaten path or inaccessible to the general public, providing photographers with exclusive opportunities to capture exceptional images.
Expert Guidance
Most photo tours are led by experienced photographers who know the area well. They can offer insights into the best vantage points, optimal times for shooting, and creative techniques for capturing the scene. This guidance can significantly enhance a photographer's skills and results.
Learn and Improve Skills
On a photo tour, photographers can learn from professionals and fellow enthusiasts. Sharing experiences, tips, and techniques with others can inspire growth and improvement in photography skills. Feedback from tour leaders can also be invaluable in refining one's craft.
Focus on Photography
When you're on a dedicated photo tour, photography is the primary focus. This allows photographers to immerse themselves fully in their craft without distractions. It's a great opportunity to concentrate solely on creating compelling images.
Networking and Community
Photo tours often attract like-minded individuals who share a passion for photography. This provides a platform for networking, making new friends, and building connections within the photography community.
Logistical Convenience
Planning a photography trip can be complex, especially when visiting unfamiliar destinations. Photo tours typically handle all the logistics, including accommodations, transportation, and permits, allowing photographers to focus on shooting rather than organizing.
Inspiration and Creativity
Exploring new places and experiencing different cultures can spark creativity and inspiration. Being in a new environment with fellow photographers can encourage experimentation and the exploration of new photographic styles.
Exclusive Opportunities
Some photo tours offer access to special events or activities that are tailored for photographers. This might include private sunrise or sunset shoots, visits to local festivals, or interactions with indigenous communities.
Build a Portfolio
By visiting unique locations and capturing exceptional images, photographers can enrich their portfolios. The diverse range of photographs taken during a photo tour can be a valuable addition to one's body of work.
Enjoyment and Adventure
Ultimately, going on a photo tour is not just about photography—it's about enjoying the experience of travel, adventure, and discovery. It's an opportunity to combine a passion for photography with the joy of exploring new places and meeting new people.
In summary, a photo tour offers photographers a curated and enriching experience that goes beyond just taking pictures. It's a chance to grow, learn, and create memorable images in inspiring surroundings with a supportive community of fellow enthusiasts.
Please check out all the tours and workshops we lead at Akari Photo Tours